
Build a Homestead
“With Hearthfire you can finally place a permanent mark on the world of Skyrim by designing, building, and maintaining your own home.”
In many fantasy roleplaying games, characters need to acquire a home or a base of operations as part of game play: in Lego Lord of the Rings, once a player gets to Rivendell, it becomes the place to view the trophies for completed minikits.

“My Megaton House” screenshot from Fallout 3 by Bethesda Softworks.
In Fallout 3, players can acquire a home in Megaton once they have defused the Megaton Bomb and then they can add storage containers, an infirmary, a workbench for repairing and upgrading equipment, and some other features–including a display case for showing off the bobblehead dolls you find throughout the game that give your player character perks.
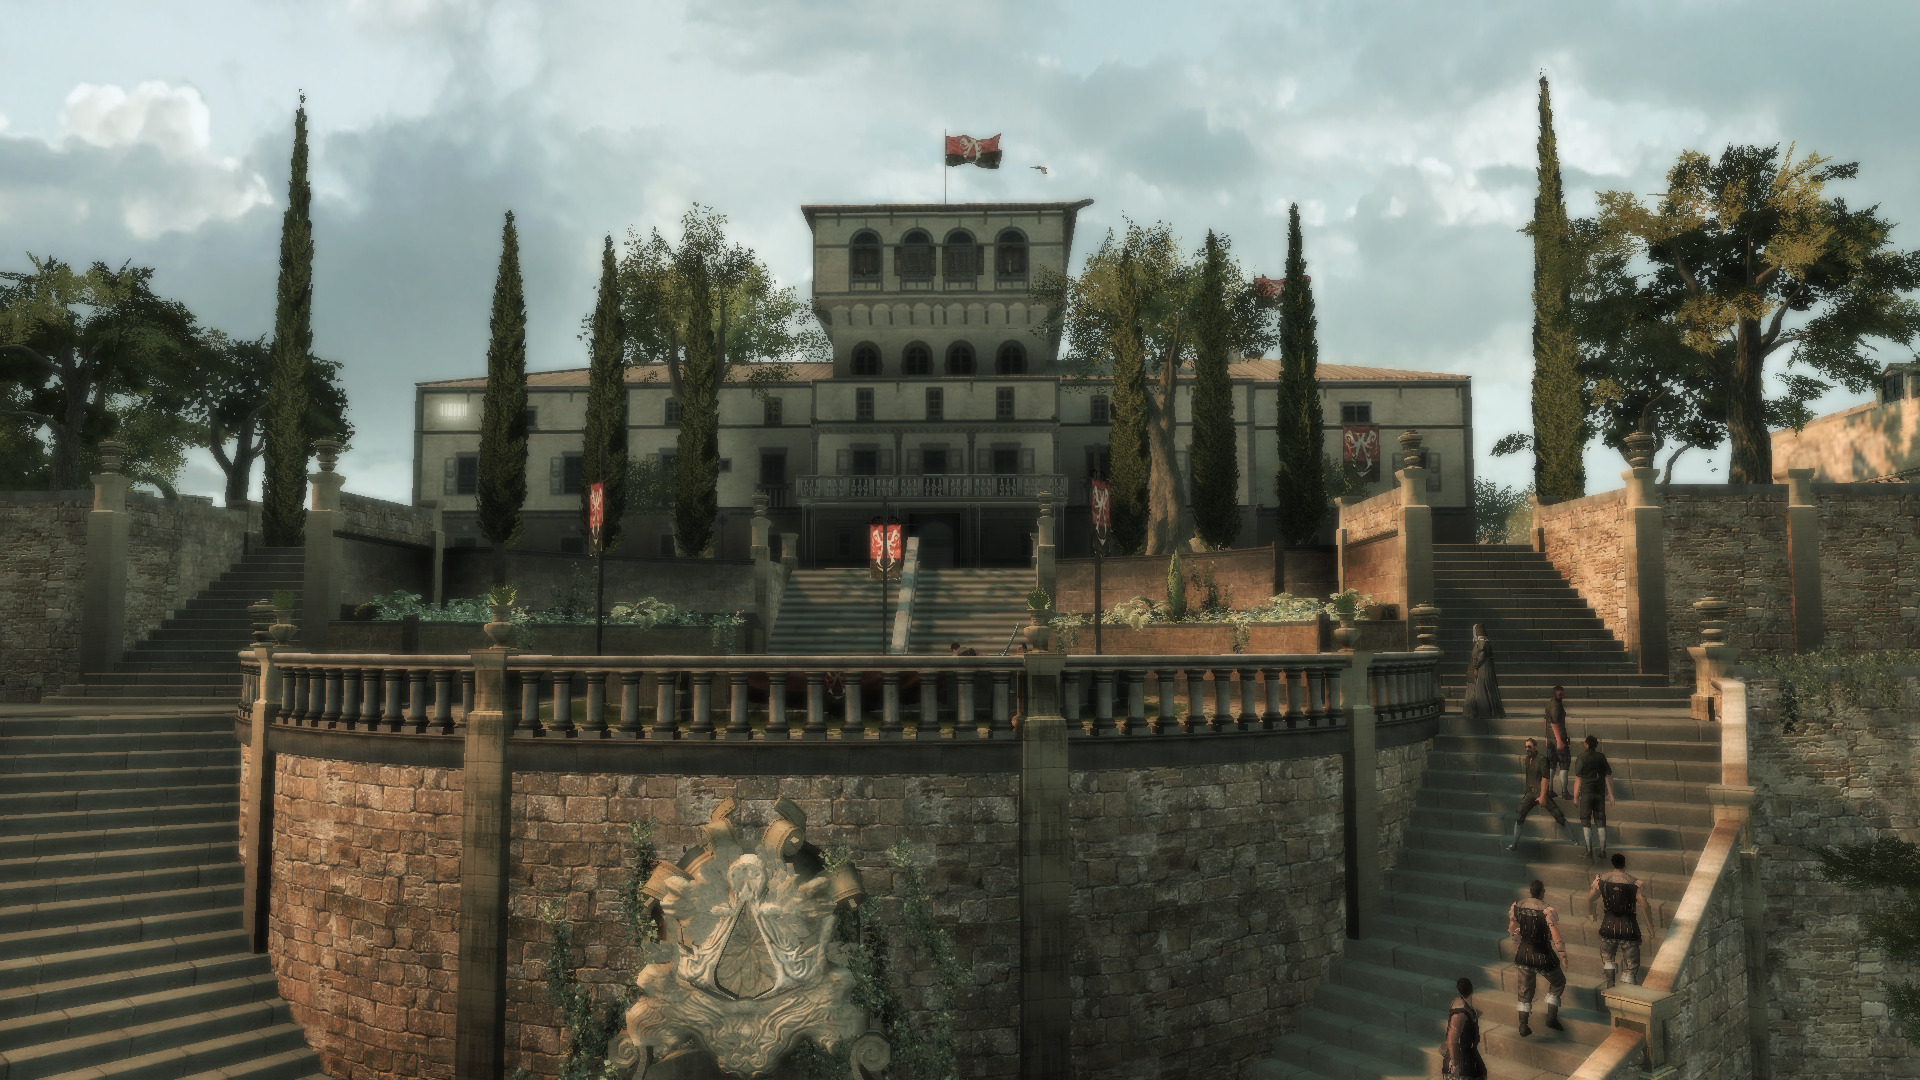
Screenshot of “a renovated Villa Auditore” in Assassin’s Creed 2 by Ubi Soft.
In Assassin’s Creed 2, players eventually gain the familial stronghold in the town of Monteriggioni, the Villa Auditore. As they complete quests the estate is restored from a dilapidated wreck to a gleaming castle, eventually uncovering hidden chambers that hold the keys to advanced gear and skills.
Domain
In Skyrim, there is an add-on game that is just about managing your home base, called Hearthfire. There’s a fairly elaborate guide in the Elder Scrolls Wiki on the steps involved: purchasing land, planning and preparation, building a small house, adding a main hall, adding specialized towers and wings, building out the area around the stronghold and adding personnel and animals.
In this class, you’ll be building your own homestead in the form of a domain of your own. Like in the games described above, in this class you’ll start with some basic components for your domain and then slowly add on additional specialized rooms to flesh out your estate or to aid you in acquiring new skills and perks.
I’ll use the same steps for building a Hearthfire estate to outline the steps for building your own domain. (Click on the titles below to display that step.)
Before you can begin building your homestead, you’ll need to own a plot of land to build on. Obtain the deed to your own domain by going to Emory Domains, signing in with your Emory NetID and password, and registering a domain name. You will need to pay $12 for the cost of registering your domain (it’s only $12 because the Emory Writing Program is underwriting half the cost by paying for the server hosting that you receive along with your domain name). Here’s a help page that will walk you step by step through the registration process.
Please do note that your domain name should not be tied to this particular class (we’ll get to that later, when you build your main hall). Think of your domain name as the land upon which you will build a sprawling estate–one building on that estate will be devoted to your first year writing class, but you’ll eventually have other edifices upon that land–so you want a domain that will allow you to grow. Either register a domain name that is connected to your own name (i.e., Jane Student might register janestudent.net) or that is a brief word or phrase that is easy to spell and fairly memorable but that connects with your long-term interests in some way (e.g., Tanine Allison, a professor of Media Studies here at Emory is finishing her first book, entitled Destructive Sublime: World War II in American Media, so she used that title as the domain name for her course sites.) You are not purchasing a web site! You are registering a domain name and server space, upon which you can build many other web sites, amongst other things.
You might look around at other sites, maybe even check out the sites my students built last spring.
- Install WordPress in your primary domain. Give your site a title that is not “My blog.”
- Configure the settings on your site, making the front page static instead of a posts page.
- Add a bit of brief language on your main page about yourself. You do not need to fully develop this page for right now.
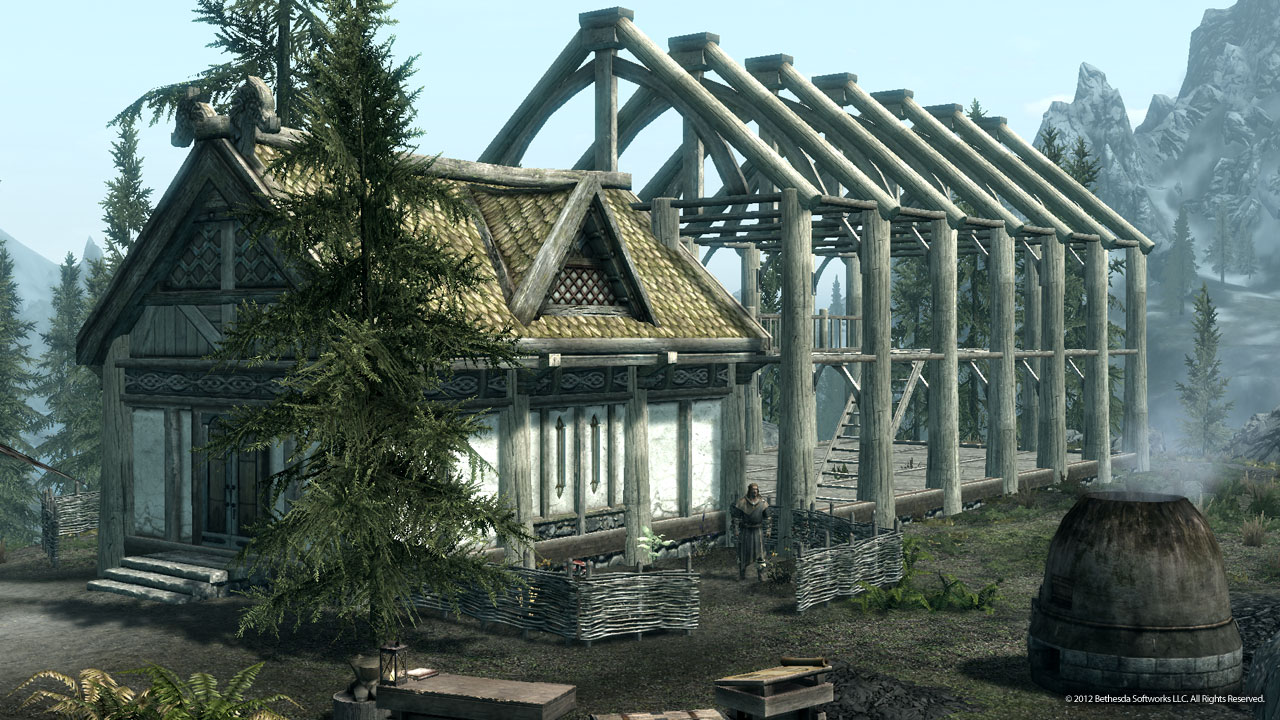
Even though it’s your “primary” domain, it’s not necessarily where the bulk of your content will go. Look at the featured image at the top of this post (here’s that picture again) and think about your small house in similar terms as that one in Hearthfire: your primary domain is the small building you create first but which mainly exists as an entryway into the main hall, which in that image is still under construction so it’s just a foundation and a bunch of beams of roof joists. The main difference in this case is that with your cPanel and server space you can build as many many halls as you like, each of them connected together via that small house.
For now, your primary domain is most useful because it’s a single URL you can put on a resume or add to a social media profile or tell a friend to, which then collects together all the other stuff you’re doing online.
This help document walks you through the steps for building a class subdomain.
Create the subdomain folder
Your domain is really akin to a folder on your computer. When I point my web browser to davidmorgen.org, it goes to that address and looks in the folder of files stored in that space, finds an index file and loads it in the browser. So the first thing you need in order to create the class subdomain is to create a subfolder, which is the simple process of going to the Subdomains area in your cPanel and naming a subfolder. You probably want the subdomain for this class to be eng181 or maybe readwriteplay. When you click on the create button after entering the subdomain name, all it does is create that subfolder on your server.
Install WordPress
The next step is to install files in that subfolder, which you do by installing WordPress a second time. The second time you install WordPress, choose the subdomain you created from the location menu, and make certain you delete the /blog/ subdirectory that Installatron suggests.
Make certain when you install WordPress that you name your site something other than “My blog.”
Configure WordPress & Create a Menu
Just like you did with your primary directory, you need to configure your WordPress settings. In this case, I’ve got some additional directions to add though.
Just as you did with your primary domain, create two new pages–one will be your static front page and the other will be your posts page.
Once you’ve created those two pages go to Settings > Reading to make a static front page that displays the new home page and to designate the other as your posts page.
Next, go to Settings > Discussion. The first box at the top of the page says “Attempt to notify any blogs linked to from the article” and by default is unchecked. Make certain to check that box. Save the changes to this page.
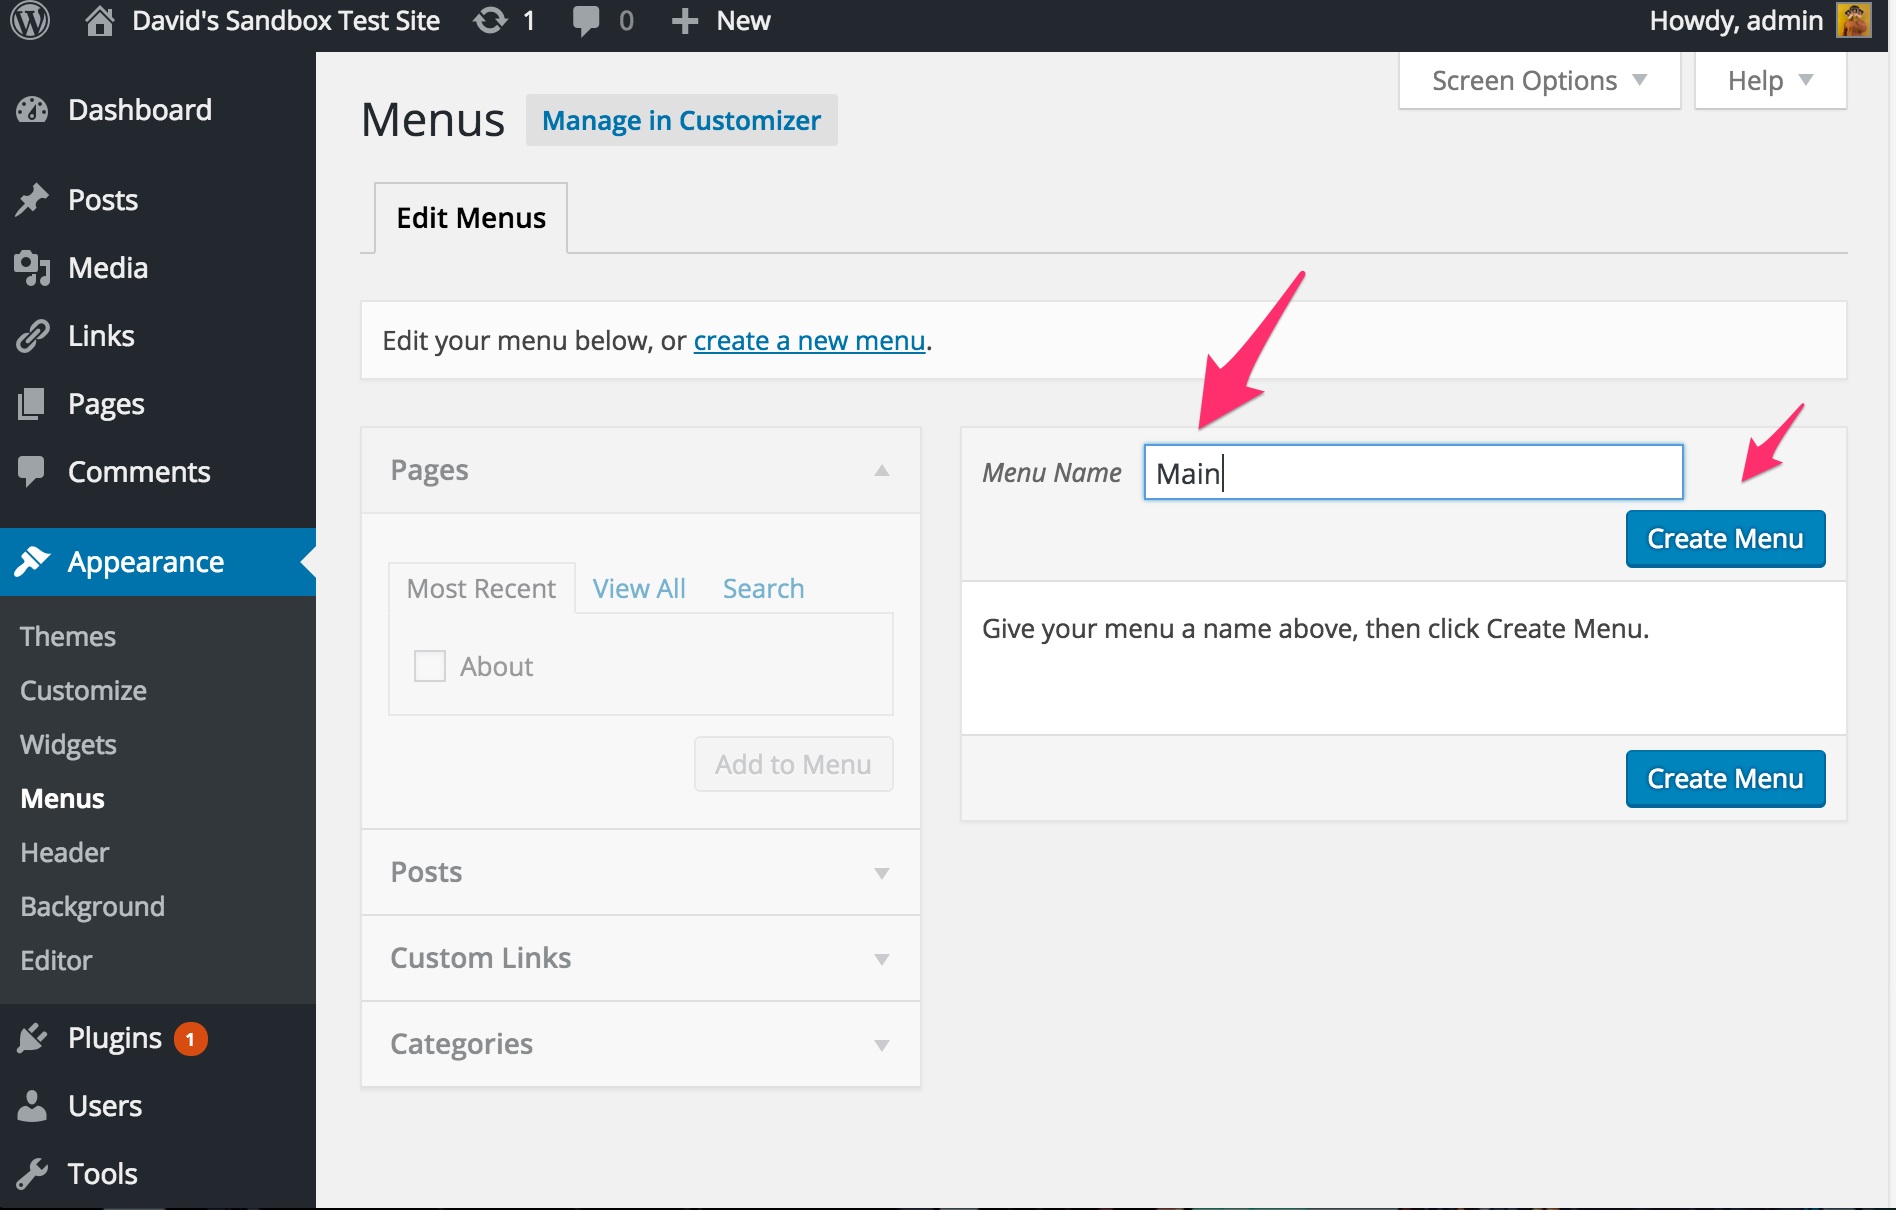 Go to Appearance > Menus and create a new menu. You can call it Main or Top or whatever you want. Once you’ve created the menu, you need to tell the site where to display the menu, so check the location box (different themes will have different locations available. The image shows the default theme for 2016, but if you’ve changed themes you might have other options). I generally advise that when you’re starting out, you automatically add new top-level pages, which you can always turn off later if you want more manual control.
Notice in the Menu area to the left, you have a palette of items that you can add to the menu. In the default setup, you can add Pages, Posts, Custom Links, or Categories. Pages, Posts, and Categories are just those items that you’ve created in the dashboard.
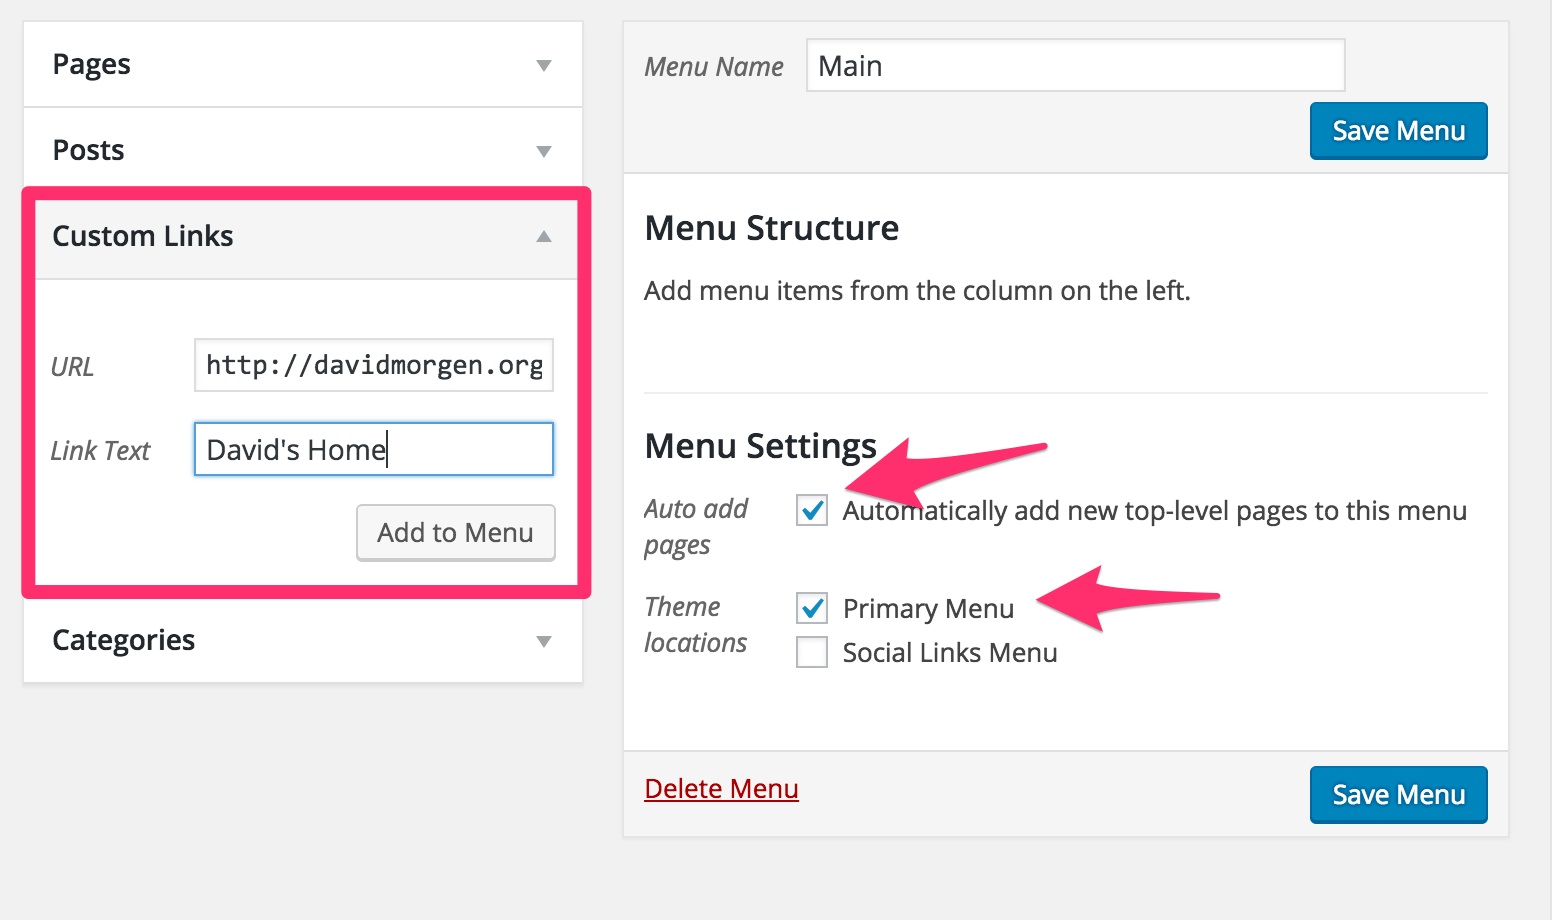 Custom Links allows you to add a link to anything on web in your menu. Add a Custom Link that connects to your primary domain by entering the address for your primary domain in the URL box and a title in the Link Text box.
Add another Custom Link, this time directed at the class page.
Save your menu.
(Later, go the dashboard for your primary domain, create a menu, then add a Custom Link for your class subdomain too.)
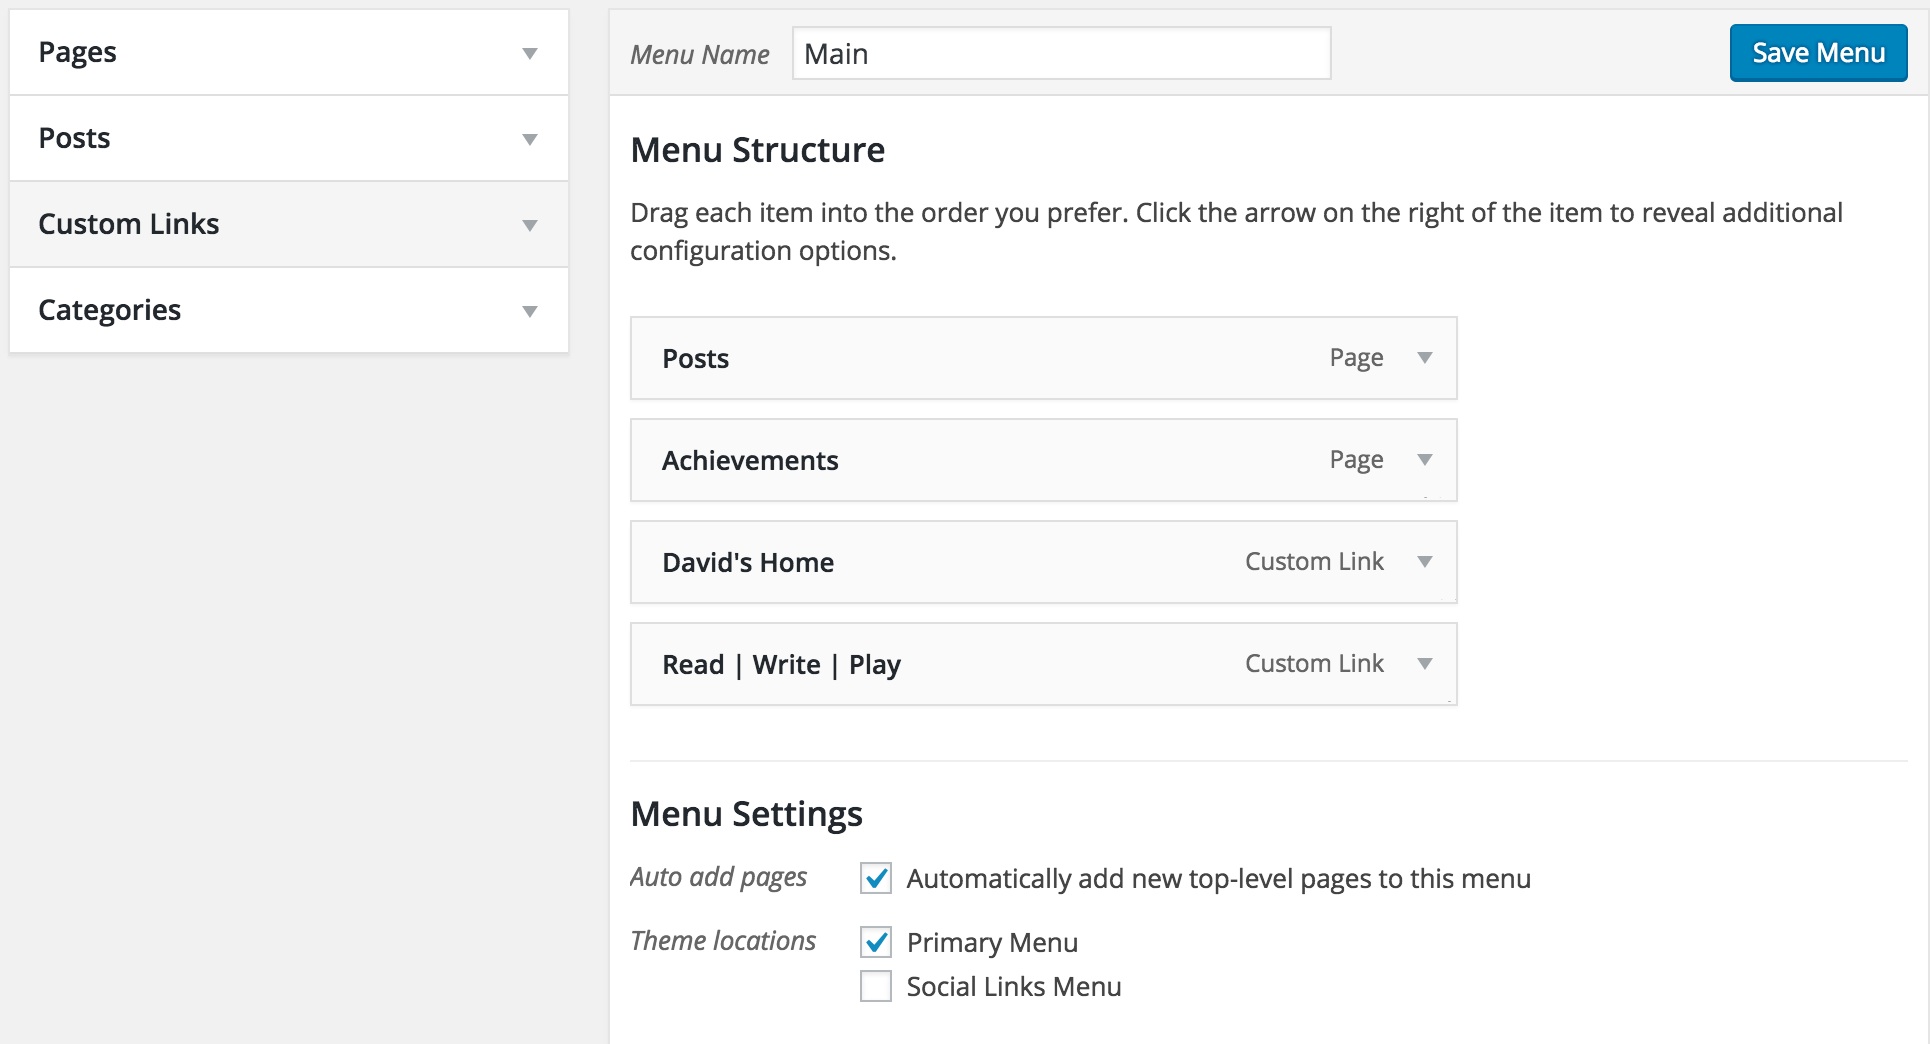 If they didn’t add automatically, make sure you add your Posts page and Achievements page to the menu as well. You should have a menu which looks basically like the one on the left.
Later, you can rearrange your menus however work for you and if you’re already comfortable with WordPress and want to arrange your menus in some other style or you’ve got a theme with other menu locations, feel free to do something different. But if you’re starting out with WordPress, following these steps will help you to make your subdomain usable quickly.
One last step remains for basic setup. In the dashboard, go to Appearance > Widgets and find the widget called Meta. Click on the title, then add it to one of the widget areas on your site. This widget adds some basic links, most importantly a link to the dashboard for your site. In the future, when you’re not logged into your WordPress account, you can pull up your site and click on the login button to get to the dashboard–there is no need to go through the cPanel to get to your site’s dashboard.
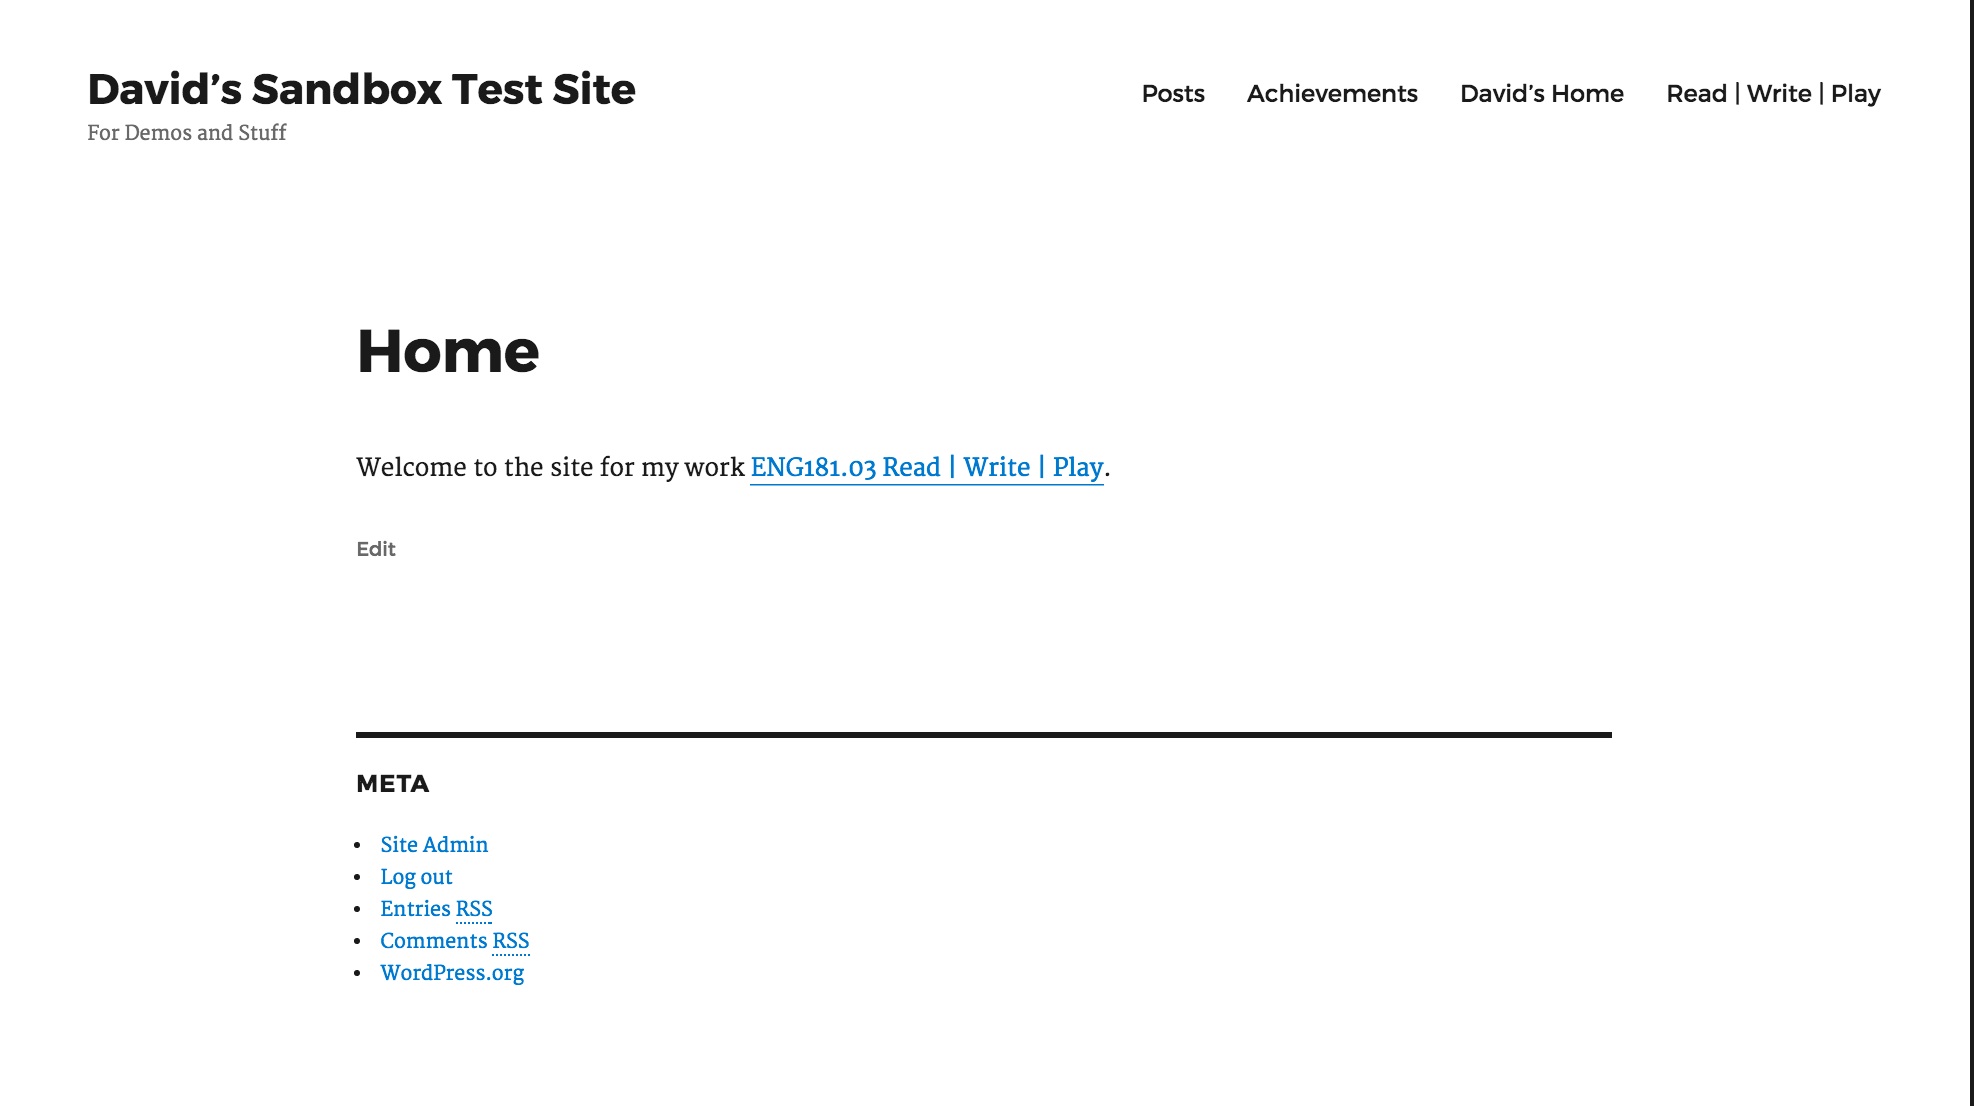
You should have a site which looks something like this now:
Eventually, I will definitely encourage you to try different themes and to customize your site. If you want to try very basic customizing of this Twenty-Sixteen theme, go to Appearance > Customize in the dashboard and try playing around with colors and/or add a header image.
A plugin is a piece of code that some developer has written in order to expand the functionality of software in one way or another. Because WordPress is open source software it’s relatively easy for someone who knows how to code to write plugins to allow you to solve problems with or add capabilities to your site. There are many thousands of such pieces of code in the WordPress plugin repository.
If you’ve used WordPress.com or had a Scholarblog site, you’ve probably never messed with plugins because there’s not much you can do with them in that environment. Plugins allow you to customize your WordPress installation in all sorts of ways but most multisite installations of WordPress don’t allow you to install your own plugins because the administrators of those sites maintain control over plugins.
Activate Akismet
When you install WordPress through Reclaim Hosting, there are some plugins that are automatically included. If you log in to your dashboard and go to Plugins, you’ll see the list of installed plugins.
Note that some of these are already activated and working automatically. Cookies for Comments is a basic spam protection plugin and it comes pre-installed and activated. Akismet is a much better spam protection plugin which you probably also want to activate–it’s not automatically activated because you need to sign up for an account with them and enter they key they provide to you first.
Check the help document on Managing Comment Spam with Akismet and follow along with it, get your own Akismet key, then activate that plugin. You can leave Cookies for Comments on, too, since they won’t interfere with each other.
Install a Plugin
Now you know how to activate an install plugin (it was easy, wasn’t it?) but what if you want to add some sort of other feature to your site and you need a plugin that’s not already there when you first install WordPress?
Let’s walk through installing the Elementor plugin, which allows you to work on your WordPress site with a drag-and-drop editor.
From the Plugin page in your WP dashboard pictured above, click on Add New in the sidebar or at the top of the page and then type Elementor in the search bar. On the next page, underneath the plugin, choose “Install Now” and confirm that you want to install the plugin.
The next page will show the progress of downloading, unpacking, and installing the plugin. Once it’s done, you can activate the plugin and from the confirmation page, or you can go back to the list of installed plugins and activate it there.
Pingback: Wordpress Basics: Comments – Read | Write | Play
Pingback: Wordpress Basics: Getting into your Dashboard – Read | Write | Play
This is my subdomain, sorry for the confusion.
http://eng181.crazierthanyoo.com/