What’s the difference between URLs and links?

URLs are for computers.

They are specific addresses that tell the web browser where to go to fetch data and show it to you in one form or another. The URL for the FAQ page on this site is http://eng181f16.davidmorgen.org/resources-and-glossary/. The URL for the oldest post on the course blog is http://eng181f16.davidmorgen.org/davids-posts/how-do-i-use-html-to-format-comments-on-this-site-others/. With a little awareness of the syntax, you can decode that information. If you wanted to read the page or post that I just referenced, you could copy that code and paste it into your browser to get there.

Sometimes people just paste URLs into emails or pages that they’re writing, and some applications will convert those URLs into links so that you at least don’t have to go to the trouble of copying and pasting the code as separate steps to get to the pages referenced. For example, one way to show you Gavin Aung Than’s comic adaptation of a quote by Jim Henson would be to just do this: http://zenpencils.com/comic/150-jim-henson-a-puppeteers-advice/. However, most of the time readers will find URLs confusing and uninviting, and it’s difficult for you to effectively contextualize that information smoothly.

Links are for humans.

Links use HTML code to turn URLs into something that is readable and clear for humans. One way to create a link is manually, by inserting some HTML code around text that makes the text into a link, so

Check out Gavin Aung Than’s <a href=”http://zenpencils.com/comic/150-jim-henson-a-puppeteers-advice/”>brilliant comic adaptation</a> of a quote by Jim Henson.

looks like this in your browser

Check out Gavin Aung Than’s brilliant comic adaptation of a quote by Jim Henson.

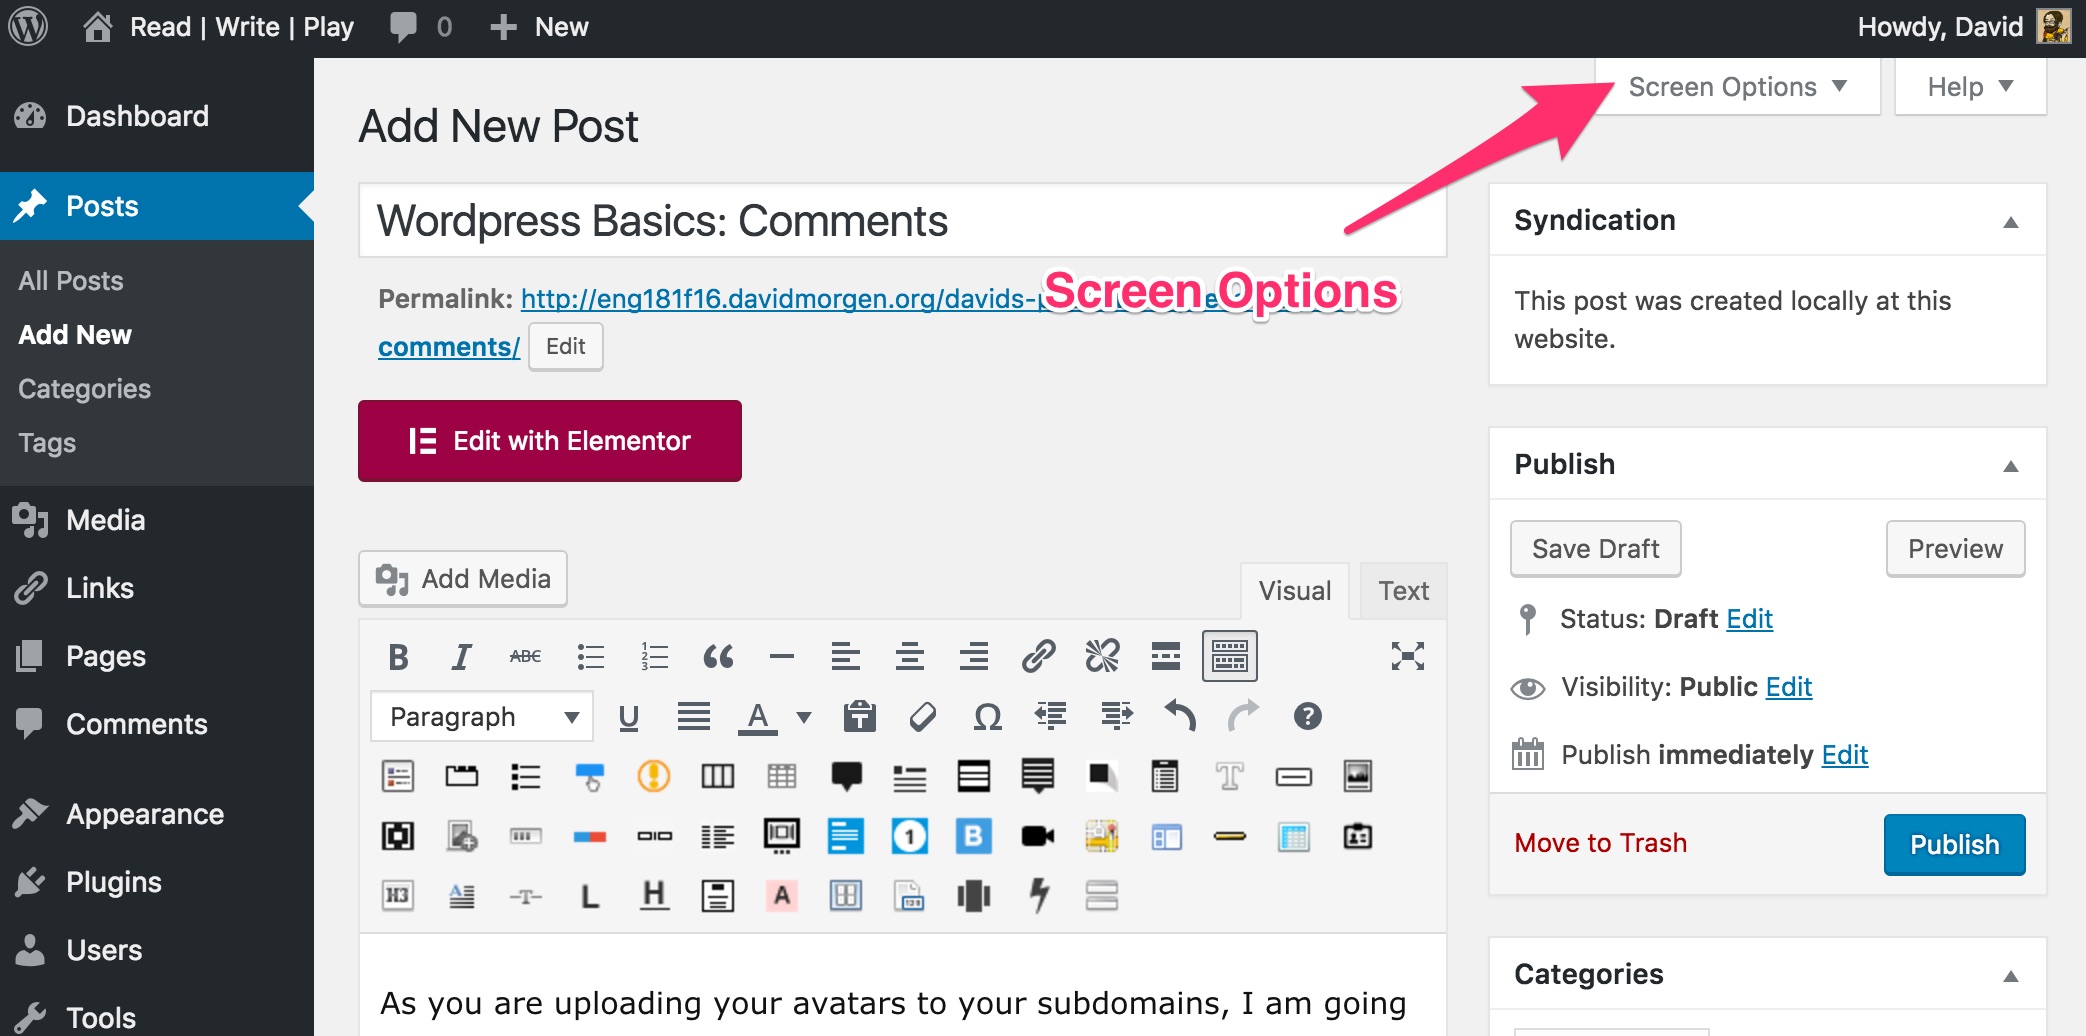
Most of the time, though, you don’t need to insert links manually. When you’re in your WordPress post editor, you can create a link by highlighting the text or image that you want to become a link and selecting the button that looks like the links of a chain, then pasting the URL into the dialog box.

This distinction between URLs and links is important for our class because our first learning outcome states that over the course of the semester, you will “demonstrate understanding of audience” and learn to “use and adapt generic conventions, including organization, development, and style.” Using links instead of URLs is an important first step in understanding the reading needs of your audience and is an important stylistic and generic convention of writing for the web.

This distinction is also important because using links opens up a whole range of more interesting options for you that are unavailable when you merely drop URLs into your work. Jokes can be goofy commentaries or can offer useful insight on the topic at hand.

How do I use HTML to format comments on this site (& others)?

Different themes handle commenting differently, but many themes allow users to create links and other formatting while leaving comments, but only if they know how to do so manually with HTML code. There’s often no visual editor that lets you use HTML at the push of a button, the way there is when you’re in the dashboard composing posts and pages.

When you’re leaving a comment on a post on this site, there’s a line at the bottom that lists the most frequent types of HTML and formatting that you might want to use:

You may use these HTML tags and attributes: <a href=”” title=””> <abbr title=””> <acronym title=””> <blockquote cite=””> <cite> <code> <del datetime=””> <em> <i> <q cite=””> <strike> <strong>

For each of those codes, you just surround some text with the applicable HTML tags (i.e., you have an opening tag <em> (which adds emphasis), then the text you want to be emphasized, then you close the tag so that the browser knows when to stop emphasizing </em>).

Code Examples

Here are examples of how each of those codes work:

<a href=”http://eng181f16.davidmorgen.org”>course homepage</a>

<abbr title=”Hypertext Markup Language”>HTML</abbr>

<acronym title=”EWP”>Emory Writing Program</acronym>

<blockquote cite=”<cite><a href=”http://www.brainyquote.com/quotes/authors/l/ludwig_wittgenstein.html “> </cite> “>If people never did silly things nothing intelligent would ever get done.
Ludwig Wittgenstein<blockquote>

<cite><a href=”http://eng181f16.davidmorgen.org/”></cite>

<code><a href=” “>course homepage</a></code>

<del datetime=”YYYY-MM-DDThh:mm:ssTZD”>This text has been deleted from the comment and there’s a time stamp to indicate when, which is not visible but is available to screen readers.</del>

<em>Emphatic!</em>

<i>Italics!</i>

<q cite=”http://eng181f16.davidmorgen.org/ “>The q cite tag allows you to provide a citation that does not show up visibly, but is available to screen readers behind the scene.</q>

<strike>This text has been struck through</strike>

<strong>Guiness for strength!</strong>

Outputs

And here’s how each of those different effects will look on this site when the comment is published:

course homepage

HTML

Emory Writing Program

If people never did silly things nothing intelligent would ever get done.
Ludwig Wittgenstein

http://eng181f16.davidmorgen.org/

<a href=" "> </a>

This text has been deleted from the comment and there’s a time stamp to indicate when, which is not visible but is available to screen readers.

Emphatic!

Italics!

The q cite tag allows you to provide a citation that does not show up visibly, but is available to screen readers behind the scene.

This text has been struck through

Guiness for strength!

Let me know where your subdomain is

If I have your subdomain address, then your posts are syndicating to Student Work (there are only 3 of you so far that are doing so). A few of you have commented on this site with links to your primary domain, but I need to URL for your subdomain. If you are not Marina, Niky, or Jasmine then please leave a comment on this post and enter the address for your subdomain as your website address on the comment form.

WordPress Basics: Comments

As you are uploading your avatars to your subdomains, I am going to be leaving comments on each of them. You should get an email notification saying that my comment is awaiting moderation . Under the default settings, the first time any person comments, that comment goes into a moderation holding queue and won’t show up on your site until you approve it but once you’ve approved the first comment from someone, your site will thereafter assume that future comments from that person are acceptable and they will be published immediately (you can adjust settings and notification rules, see below). You can get to the Comments area of the dashboard either by clicking on the comment bubble in the toolbar at the top or by clicking in Comments in the sidebar.

Please do comment on the course site and on your classmates’ sites, and please go in and approve comments from your peers and myself.

Here’s the WordPress codex help page on the Comments screen.

Comment Settings

You can adjust the settings for how your site handles comments by going to Settings > Discussion. Here’s the WordPress codex help page on the Discussion Settings page.

Please do make certain that you check the first two boxes in Discussion Settings to turn on “Attempt to notify any blogs linked to from the article” and to “Allow link notifications from other blogs (pingbacks and trackbacks) on new articles.” Otherwise, you can adjust the settings as you please, but I do think it’s a good idea to leave the default setting for “Before a comment appears … Comment author must have a previously approved comment.”

Managing Comment Spam

If you don’t do anything to manage spam comments, your site will quickly fill up with random spam comments from bots trying to insert links for their spam sites. See the next tab under the Building a Homestead assignment, Building Specialized Towers and Wings, where the first step is to activate the plugin Akismet that came pre-installed on your site. Akismet will block pretty much any spam comments without you ever even having to see them.

How to Turn Comments Off or On for Specific Posts or Pages

You can change site-wide comments settings at Settings > Discussions, but if you just want to turn comments off for a specific item or items, you can do that too. (My rule of thumb for most sites I manage is that I turn off commenting for pages but leave comments enabled for posts. You might consider whether that makes sense for you or not as well.)

If you open the post or page editor, at the top of the screen is a tab for Screen Options.

Add_New_Post_‹_Read___Write___Play_—_WordPress

Screen Options allows you to configure your dashboard. Check the box to turn on Discussion and from now on, whenever you are in your post of page editor, there will be a box underneath the editor screen that allows you to turn comments and pingbacks on or off for that specific post/page.

Discussion_check_box


WordPress Basics: How to Add a Post or Page

As you begin to use WordPress, the diagram showing the parts of the dashboard on this page might be helpful for you.

Don’t be afraid to ask me if you have any questions about this stuff, but you can figure out a lot on your own by playing around on your site or by reading over help pages.

Adding Pages and Posts

Once you’ve got your sites created, how do you publish content onto them? Here’s a quick help page on adding posts and pages. This help page goes over the distinction between posts and pages — the biggest thing for you to understand for the purposes of this class is that posts syndicate but pages do not. You’ll publish major assignments as pages on your site. You’ll publish reflection writing and lower-stakes writing as posts, and every post you publish will syndicate onto the Student Work category page.

When you publish a major assignment, because it’s a page, it won’t show up on Student Work. Every major assignment you publish will be accompanied by reflective writing, which you will publish as a post, and in that post you will link to the intro page for your major assignment piece. I consider your major assignment “turned in” when you publish that post and it shows up in the course feed.

(This will all probably seem a little confusing to you when you read about it in the abstract, but trust me that once you start doing it, you will make sense of it pretty quickly. If you get confused by the process early on, don’t panic!)

Working with Other Media

You can add images (or audio, video, PDFs, and other files) into a post or page by clicking on the Add Media button just above the post editor, to the left.

This help page goes over some of the basics of uploading or embedding media.

The WordPress codex page on the Media menus is more detailed and very helpful if you’re running into issues.

Further WordPress Orientation

The WordPress codex has a more detailed page for “First Steps with WordPress,” with lots of information and links to specific individual help pages for many other issues. The information outlined above covers probably 95% of what you’ll need to be able to do for this class, but if you’ve got other questions or you want to explore further, that page is probably a good place for you to start.

WordPress Basics: Getting into your Dashboard

Once you’ve got a domain and a subdomain setup, remember that those are two separate websites — two separate installations, with two separate dashboards to manage what goes on the site.

Methods to get to your dashboard

You can get to your dashboard by going to the URL and adding “/wp-admin/” onto the end of the URL in the address bar (so, [your_domain_name.com]/wp-admin or [your_subdomain_name.your_domain_name.com]/wp-admin/) and then logging in with the username and password you established when you installed WordPress.

Even better, if you followed all the steps in Adding a Main Hall and added the Meta widget to your site, then you’ll have a link on your homepage wherever you placed that widget that will take you directly to the login page. (If you scroll all the way to the bottom of this course site, you’ll see in the footer that I’ve added a link in my footer menu called “Site admin,” which is what I use to get to my dashboard instead of adding the entire Meta widget.)

What if I forgot my password or username?

If you ever forget your password (or if you forgot to specify a username in Installatron when you set your site up), you can always get into the dashboard of your site through a roundabout method:

  • To to emorydomains.org and log in with your Emory NetID and password to get to your cPanel.
  • In the area for Web Applications, find the icons for My Applications and click on the site you need to get into.
    Domain_of_One_s_Own___Emory___Dashboard
  • Click on the address that shows your site with the /wp-admin/ added on to the end and cPanel will automatically bring you to your site’s dashboard, bypassing the login screen.
  • Once you are in your dashboard, you can reset your password by going to Users > Your Profile

Pacifist Role-Playing Game


Lotus Dimension is a new tabletop RPG up on Kickstarter that explicitly frames the game as pacifist — they’ve removed all the combat dynamics traditionally included in such games:

“If you can’t kill it, get creative” is the first thing any novice D&D player would learn during their maiden venture into its world. Lotus Dimension is simply removing step one. If you know you can’t kill it from the beginning, what else can you do? In Lotus Dimension, that question underlies the whole game. As the Kickstarter states, it “[replaces] violence and weaponry with empathy and ingenuity.” You’re forced to work around combat, and in an adventure game like this, that mentality can completely change the way you play the game.

What possibilities do you see in games that attempt to foster empathy?

Week Ahead: 2

2 8/30 Sign up for your domain and install and configure WordPress.
9/1 Bogost HTDTWV “Media Microecology” (1-8).Also, create subdomain for this class, install and configure WordPress.
9/2 First sidequest due: Create an Avatar

If you haven’t already, register a domain and install WordPress in it — in the terms of your Homestead assignment, purchase your land and build a small house. (More detailed instructions are included on the Homestead assignment page and there are links from there to even more detailed instructions.) Definitely have that completed before class on Thursday (if you run into troubles, email me).

If you can, also go ahead and create a subdomain for this course and install WordPress in it — in gaming terms, add your Main Hall. (Note: the second time you install WordPress, choose the subdomain you created from the location menu, and make certain you delete the /blog/ subdirectory that Installatron suggests.) Follow the instructions on the Homestead assignment page to configure some of the basic settings for your subdomain (static front page, create a menu and add custom links to your primary domain and to the class page, and add the Meta widget to your site). I’d like you to have this done by class on Thursday, but if it takes you a day or two later than that, it’s okay.

Before class on Thursday, also read the introductory chapter of Bogost’s How to Do Things with Videogames (PDF of those first few pages below). Think about the rhetorical situation for this chapter:

  • What are Bogost’s primary goals? What does he want to persuade his readers to believe or what behavior(s) does he hope to foster in his readers?
  • What is the context for this book? Based on what you know of discussions about videogames, and especially based on the ways in which Bogost characterizes that discourse within the chapter itself, how does this book respond to already ongoing conversations?
  • What audience(s) is Bogost writing for?

I’ve shared two folders in Google Drive with each of you — one folder that includes the entire class and one folder for each student that is shared only by that student and me. Make certain you can access both of those folders. Starting on Thursday, we can begin to take notes together and work in documents together in class.

We’ll also spend a bit of time in class on Thursday going over the first sidequest assignment.

Download Bogost “Media Microecology”

1 4 5 6 7 8 12